Science and Geography Free Homeschool Guide
In this Natural Science Guide we continue learning about the planet and its geography while conceptualizing Earth’s orbit and rotation. In this second part for families who have gone through the first part (Free Natural Science Guide for 5 – 8 year olds), we keep building on to that. We stay with Astronomy, but now move on to a more in-depth reading of the globe, the solar system, the seasons as per the orbit and tilt of the Earth, the atmosphere and how plants make air for us to breath, Biology (germination, photosynthesis, pollination), weather patterns. We also incorporate 5th grade lessons in a fun and palatable way for 8 to 10 year olds, like explaining angles (geometry) and how this applies to the globe: measuring angles and degrees, reading coordinates and doing a real treasure hunt with coordinates.
Please note that the curriculum is meant to be progressive. It was not designed to jump back and forth to lessons. But if you have enough handle on this subject and you are mixing with another curriculum, go for it.
This is not a race against the clock. Don’t do more than one lesson per day or per week. Take your time, go back and recap, keep going back and recapping. Let kids take their time with the projects and activities.
Although we start Lesson 1 with a couple of YouTube videos, that will be the first and last time an online resource is used in this guide. Those videos offer a fun and upbeat way to visualize the solar system, they are short and they are sweet.
There are some supplies that I recommend using in order to use this guide. You will need a book with pictures and text explaining what you will be teaching them. This just get them to do a little reading and have another source to reiterate what you tell them. It also encourages kids to find more information on books. After all, the aim of this guide is to educate kids on understanding the world around them but most importantly to expose them so that somewhere in theses lessons and activities we might ignite a an interest to dwell deeply into these subjects.
So, You will need to purchase some resources:
We use an inflatable globe! This is key. We need that globe. You will need maps: Europe, World, and USA (we use a nice big 3ft by 5ft map for the wall, find the one you love best). Scroll through for insight of supplies and books and links to recommendation. And if you can and want, I recommend this telescope. This is the suggestion from an astrophysicist friend of ours: “the most important aspect is that the tripod is steady and does not make the image jittery”. So this is tried to be a good one. A telescope will cement the connections and promote a love for what we are learning here. “If you want to spend more, find a great tripod, and a good quality binoculars.”
You may already have all that stuff, but if you don’t I like the items below. If the ones we use were not available, I carefully found others that will do the job just the same. Yes, there are links to Amazon but when at all possible I recommend you BUY LOCAL.
Thank you so much for your support and enjoy!
Lesson 1. The Solar System
There are two or three videos that I like to start with to engage the kids and that explain the solar system. I start with this one:
And next move on to these ones which come across as just funny and silly but are actually the ones kids will learn the most from. Even the older ones, because the songs are awesome:
Have fun with it and play them a couple of times, or over and over while they do the next activity, the songs are catchy.
Activity
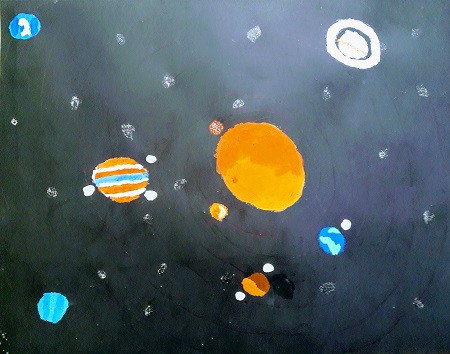
Paint a Solar System
You can do this individually or as a collaboration.
When I did this we had another kid over joining us for this lesson. So, we decided to add a little competition into it: Whoever painted the best Solar System got to request an item from the supermarket. Of course, they tried their best, took their time and wanted to make great planets by adding more detail, glitter for Saturn’s rings, etc.
The kids referred to a book to get ideas on colors or textures. They added asteroids, and glitter for the “dust and icy particles of Saturn’s rings”!
The kids wanted to know about the Dwarf planets, Pluto Ceres, etc. The solar system lesson can be as rich and as fun as the kids drive it to be.
Encourage talking about the different planets:
Earth is the only planet that has air we can breath, and therefore the only one with organic life. Earth takes 365 days to orbit around the sun. That’s one year. Right?
Mercury is the closest one to the sun, therefore it takes less time for Mercury to go around the Sun.
Venus, is the second planet from the Sun and the hottest planet, because it’s atmosphere traps the heat in.
Mars is the red planet. It has two moons but they’re not round like our moon. Mars is the fourth planet from the Sun.
The red spot in Jupiter is a big storm that has been going on for 200 years.
What is your favorite planet? Why?
Etc.
The Sun, was thought to be a planet up until about a hundred years ago. When an astrophysicist named Cecilia Payne discovered that the Sun was made of mostly hydrogen and that other starts had about the same composition. Therefore, we now know that the Sun is a star.
Astrophysicists and astronomers study the composition of stars is by using a tool called: spectroscopy.
What is the most important tool to observe the Stars? A telescope.
Talk about life in other planets in the Solar System. Could anyone live on Venus? With a toxic atmosphere and such hot weather we could not live on Venus, etc.
Could we live on Jupiter? Even if we could survive the never ending storms, Jupiter does not have a surface. It’s made of gas!
Etc.
Make sure that what they understand from this lesson is that the planets all orbit around the Sun and that it takes 356 days for us, Earthers 🙂 to go around once. That’s one year!
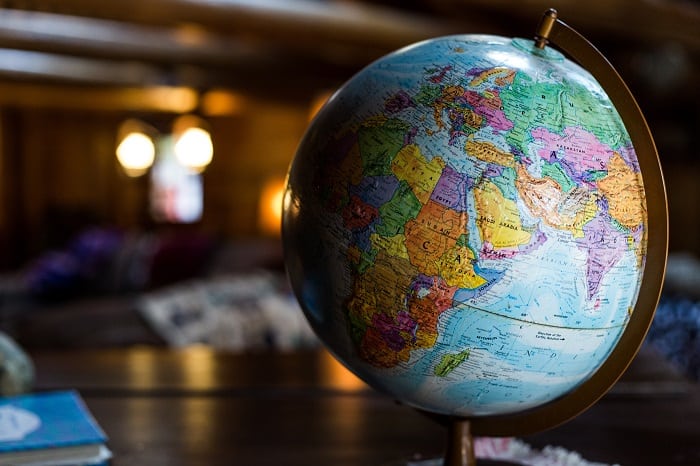
Lesson 2. Reading The Globe
If you can’t bring yourself to using the cheap and incredibly versatile inflatable globe, get a nice large enough but not too large real globe that will last forever. I like this one.
Recap continents. Ask the child to: Point to Africa, Point to Europe, Point to Australia, etc.
Ask the child to: Name all the continents.
Continents are large land masses. All the countries are inside continents. They are surrounded my oceans.
Recap hemispheres: The top half of the globe is the Northern hemisphere. And the bottom half is the Southern Hemisphere.
Show me the North Pole. Show me the northern hemisphere.
Show me the Southern Hemisphere. Where is Antarctica?
The line that divides the two hemispheres is called the Equator. It is the line that divides the two halves of the globe.
See? It’s in the middle and it’s where the Earth is the biggest.
Because it’s in the middle, it gets more or less the same hours of sun in the winter and in the summer. See? (Demonstrate with your globe and a flshlight pointing towards it which would be the Sun.)
Note: You should always go back to recap the lessons. So, if you didn’t get to some of the previous content, bring that up when you recap.
Lesson 3. Play this Geography game:
This game is played with your globe. The inflatable globe ball is awesome because it’s easy to handle and you can throw it over to the next player, or back and forth if you are playing with just one child.
Each player has to get 3 answers right. There are 5 chances.
Ask questions from the Natural Science Guide I:
Show me Australia
Where is the North Pole?
Where is the South Pole?
Show me Europe:
You can give tips like “Look in the Northern Hemisphere.” “France, Spain, Germany are in it”. Etc.
Which Ocean is between America and Europe?
CORE LESSON:
Point out that the Southern and Northern Hemispheres are divided by the EQUATOR.
Ask if they can find the Equator.
Play this game back and forth as long as they want. Let them have fun with it.
(My daughter asks me about the tiniest countries and islands she can find on the globe to make me miss. She loves to see me struggle and miss my points.)
Give points even if you have to help her a little but gets it right. If they need too many clues, just move on to the next question. And during another turn ask the question they missed before.
You can play this game as often as possible, but don’t make it seem like a chore. Geography is fun!
Lesson 4. Longitude/Meridians
Can you find the lines that go up and down from the North Pole to the South Pole? See these lines that run along the globe? These are invisible lines that converge at the north and south poles. They “meet” at the north and south poles and are called Longitude lines.
These invisible lines are important because they are between two very important lines that we use to tell the time on Earth.
They are the Prime Meridian. Point to it. And just on the other side of the globe from the Prime Meridian is the International Date Line.
These two lines determine what time it is where we live and everywhere else in the World! That is why we say for example 9am and 9pm. If it’s morning we say is am “ante meridian” or before meridian or mid day. If it’s pm it means it is “post (or after) Meridian -mid day”.
In reality all these lines of longitude are called meridians. But the most important one is the Greenwich Line, The Prime Meridian. Can you find it? Here is a tip, it goes through England.
Where would the international date line be? Here is a tip, it should be on the other side of the globe from the Prime Meridian.
The meridians, or longitude lines are spaced out in degrees.
Lesson 5. Parallels / lines of latitude
The lines that run parallel to the Ecuador are called Parallels or lines of latitude. Remember the equator? Point to it.
Can you find the lines that go around the globe? They are called parallels because they never converge. They are like invisible rings, they never meet.
We already know the most important one, the one that divides the hemispheres. It’s is called…? Yes, the Equator. Show me the Equator.
Good. Now see these lines north of the Equator? These also have names and are called the Tropic of Cancer and Tropic of Capricorn!
Everything in between we call the tropics and that is where there is Tropical kind of weather. Warm and humid all year around.
Why do you think it is warm all year around the Equator?
Lesson 6. The Earth Orbit Birthday Calendar
I love this book, The Sky from National Geographic, and use it for many of the concepts we go through here. I have even photographed some pages (below) to illustrate some of the learning in case you cannot find this book anymore. Here are some alternatives:
50 Things to See with a Telescope
Luna: The Science and Stories of Our Moon
Recap the Solar System
What is the name of the scientist who discover that the Sun is a star? Cecilia Payne
What are those kinds of scientists called? Astronomer and Astrophysicist
Which are the planets in the Solar System?
How long does it take for the Earth to spin one time? 24 hrs.
How long does it take for Earth to go around the Sun once? 365 days or one year.
Ask them what they know about Mars, about Saturn, about Jupiter.
Review the four seasons and where we are in relation to the sun during the different seasons.
CORE LESSON: Conceptualizing the Earth in relation to the Sun and how the positioning of the Earth and the tilt is the reason for the seasons, food, birthdays, weather.
Draw a Sun. Mark the solstices:
We know the tilt of the Earth is the reason why we have seasons.
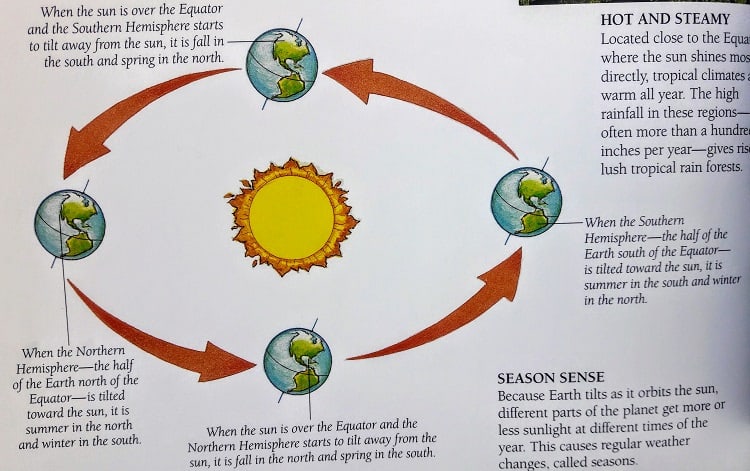
Together, make a painting of the earth revolving around the Sun (orbiting). Have fun with it. Let the child do most of the fun work. Make sure to mark the tilt of the Earth, and to make the circle light on the side where the sun shines and dark on the opposite side.
Mark which position is Summer and Winter where you live. Explain that when it’s summer solstice in the Northern Hemisphere it is Winter Solstice at the same time in the Southern Hemisphere.
Draw the Earth at Autumn and at Spring. Mark where your birthday and those of family members would be along the Earth’s orbit. So, if your birthday is in November you would mark a little before where you draw the earth at winter solstice. And so on with all the months.
Talk about how many times they’ve been around the Sun.
The positioning of the Earth and the tilt of its axis is what makes days longer in the summer (the sun sets very late at night and shorter in the winter -it gets dark earlier in the winter).
Point out that in winter the North Pole doesn’t get any sun shine so it’s dark most of the day. While in Antarctica, it is Summer and it is light most of the day.
Lesson 7. The Atmosphere
We know some planets are just gas giants with no surface like Jupiter. And most are rock with no atmosphere, like Mars. The only planet in the solar system that is not too hot and not too cold and has air to breath is Earth.
Earth wasn’t always this way!
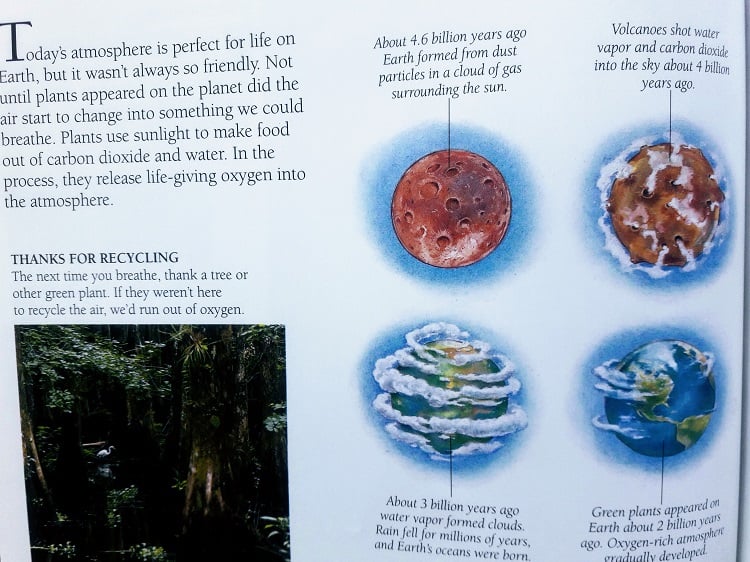
4.6 billion years ago the Earth was much like Mars. Just a rocky planet. Volcanoes inside the Earth started to erupt. Water vapor came out of the volcanoes mixing with carbon dioxide, and clouds started to form. About 3 billion years ago, clouds covered the earth and it rained…and rained…and rained…That is how the oceans were formed.
“The atmosphere is the air that plants and animals breathe to survive. The atmosphere is made up of mostly nitrogen (78%) and oxygen (21%). There are lots of other gases that are part of the atmosphere, but in much smaller amounts”.
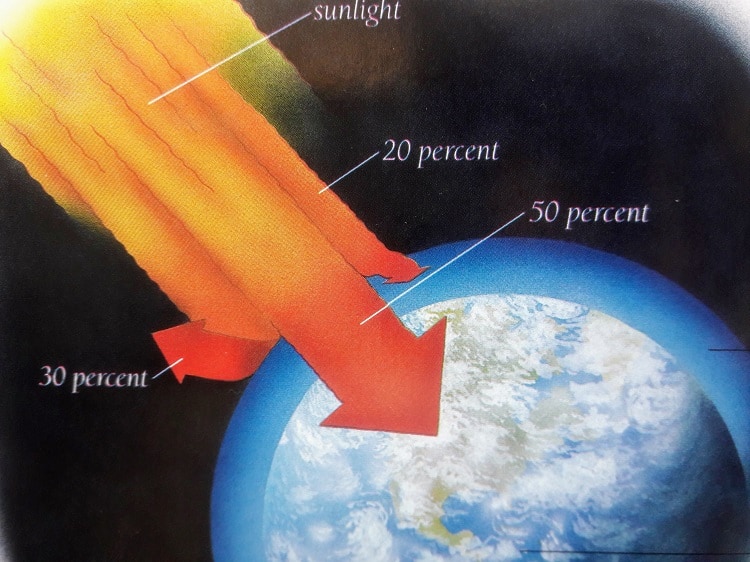
“The atmosphere protects Earth like a big blanket of insulation. It absorbs the heat from the Sun and keeps the heat inside the atmosphere helping the Earth to stay warm, called the Greenhouse Effect. It also keeps the overall temperature of the Earth fairly steady, especially between night and day. So we don’t get too cold at night and too hot during the day. There is also a portion of the atmosphere called the ozone layer. The ozone layer helps to protect the earth from the Sun’s radiation.”
Recap what the weather is like during the seasons and why that is in relation to where the sun is and how much sunlight plants, oceans and land masses are getting…
Activity:
Draw the seasons. Start your favorite season and make a beautiful painting or drawing depicting that season.
Talk about why you like that season. What you can do, and what it feels like.
Make sure you support your artwork with all the scientific fact you know. And write on in where in the Earth this is, Is it in the Northern Hemisphere? If so, how is the Earth in relation for to the Sun? For example: “This is in Lake Tahoe. It is winter. The Earth is facing away from the sun, so Tahoe is not getting much sunlight. The air gets very cold and the water freezes.”
Lesson 8 BIOLOGY
- Up until now we have learned about outer Space: The Solar System, the Planets, Earth’s Rotation and Orbit. The Sun. This is called Astronomy.
- We have also learned Geography: the Continents -name the Continents! What are Continents ? They are large land masses with countries in them. We’ve learned about countries, and oceans, and the Equator…What else? (Lines of longitude, parallel lines, hemispheres…etc. That stuff is the study of the Earth and the globe. It’s called Geography.
- Now we are going to learn about life on Earth, how life grows on the Earth. That is called BIOLOGY.
In order to really understand how life on Earth works, we have to remember about the atmosphere and the seasons.
Recap seasons:
What happens in the fall? As the earth goes around the Sun, we start getting less sun time during the day and the nights get longer, because of the tilt of the Earth. Plants shed their leaves.
Remember? Illustrate again with an orange, a ball or the globe.
What season comes after fall?
In winter, the days get shorter until we get to Winter Solstice. The darkest day of the year, but also after winter solstice, the days start getting longer. Remember?
After winter, the Earth starts getting more Sunlight in the area where we live. It’s starts to warm up a little bit so the seeds can grow into plants. We call that….Spring.
You can plant a garden from seed and watch your seeds sprout, grow into plants, watch the plants grow everyday, and continue until flowers bloom.
What Happens In Spring
Recap:
What is the atmosphere? It’s a layer of gasses that surround the Earth. What does the atmosphere do for the Earth? It filters the strong sun rays and keeps us warm.
The warm Sun rays go through the atmosphere and the plants use the sun light and the water to make food so they can grow. Plants use a gas called carbon dioxide, sunlight and water to grow. All these things are in our atmosphere. This process is called PHOTOSYNTHESIS
The book below is a great addition to this guide.
In turn, the plants make oxygen for humans and animals to breath. When the animals and humans breath out, there is carbon dioxide in the air, which in turn the plants use to make more oxygen.
Fun fact, if you are ever sick and have a cold and need more oxygen you could put more plants in your house.
Activity
Germinate seeds.
We’ve used a variety of seeds like carrot seeds, tomato seeds, popcorn and beans.
Put the seeds in small containers with gardening soil and cover with plastic. Put them on a large tray on a spot in the house where they get a lot of sun. Water them a little bit everyday. Watch them sprout after a few days.
“ • Take a few moments to walk around the garden and locate the area where you would like to plant your seeds. How much room do you have?
- Look at the back of the seed packet and see how much room each sprout will need and use your ruler to determine how many seeds you can plant in that area.
- After you have prepared the soil, read the back of the seed packet for any additional information about your vegetable. When sowing directly into the ground, it is best to sow in rows so we can see what grew and where!
- Create a little trough with your shovel in a line then drop seeds along the row. Gently cover with dirt, water, and wait.
- Depending on the seed type, it could be a few weeks before you see growth but remember to keep coming back to water and weed around your seeds.
- After planting in the ground, open your seed packet and gather your other materials. Gently lay 1-3 seeds on a square of paper towel.
- Fold one side of the towel over the seeds and dampen (avoid soaking) the paper towel with a spray bottle.
- Put the paper towel inside a clear plastic baggie and seal.
- Label the name of the plant and the date on the front of the bag. Take the seed home and place it in a warm sunny spot.
- Check in on your seed, tracking your observations. When roots appear, check the weather to make sure there is no danger of frost and bring your seed back to the garden to be planted in its designated spot.
- Keep track in your journal following the garden seeds and the seeds you’re sprouting. Record when you first see roots or shoots. Which group did you observe a change in first? Which group was the most successful? “
We’ve had fun with corn because we always have organic popcorn around the house and the plants grow very fast.
You can also use seeds from a tomato, but it will have to be an organic tomato as I’m not sure the GMO tomato seeds will grow. Something to discuss and experiment with…
GERMINATION
“When a seed germinates, a plant grows out of it. It’s only partially true to say that flowers form from seeds because, actually, the whole plant forms from the seed. Even many non-flowering plants like pine trees come from seeds. After the plant matures, it reproduces. For flowering plants, that means they make flowers to attract pollinators. Pollen is delivered to flowers by bees, wind, or a number of other “vectors.” Sperm cells leave the pollen and fertilize the eggs, which are found deep inside the flower. The outer parts of the flower (the parts we think are pretty) then die, but the inner parts that contain the fertilized eggs develop into fruit. All fruits contain seeds (so tomatoes and zucchinis are fruits, not vegetables). The fruit’s job is usually either to provide food for the baby plant or to tempt an animal to eat the fruit, spreading the seeds in the process. Once the seeds are out of the fruit and into the ground, they grow into new plants.”
THE MOST IMPORTANT JOB ON EARTH
Pollinators like bees have the task of bringing pollen from one flower to another. When a bee goes to collect nectar from a flower,the pollen which is a fine sticky dust gets stuck to the bees’ bodies, or legs and when the bee goes over to another plant, some of the pollen falls off of her and onto the next flower. This is called pollination.
By pollinating (taking the sperm cells from one flower to another and fertilizing the flower), we get a lot of our food.
Tomatoes, avocados, grapes, etc, use pollination to grow fruit. Most flowers want to be pollinated, so they make themselves look and smell wonderful to attract bees. Some plants compete by blossoming at night, so they know they will attract other pollinators like moths.
There are all kinds of interesting ways that plants devise to propagate and survive.
GEOMETRY LESSON 9 – ANGLES AND DEGREES
You will need a protractor for this. And ideally a ruler. You can get a cheap little set. They’re not going to do anything grandiose but they may get orange juice on it…We got something like this from Amazon.
Discuss and illustrate 90 degrees. This is the most common angle. We see it everywhere we look. Give Examples. Point objects.
180 degrees. That is half a circle. A circle has 360 degrees. What! Everything is connected isn’t it? There are 360 to 365 days in one year right? It takes about 365 days for the Earth to go around the Earth.
If you look at the globe it is divided also in angles. Yes, that is also connected. So from the Prime Meridian to the International date line this way is 180 degrees. And on the other half is also 180 degrees. That makes…Yes! the whole circumference. So the globe is divided into like 2 protractors along the Equator. We are going to see why that is.
Then we have 90 degrees going from the Equator to the North Pole, and from the Equator to the South pole.
Activity
Cut an orange in half and observe what is the angle (360 degrees). Now cut a wedge to the middle top. Measure or estimate how many degrees that measures -90 degrees. Now you can measure the degrees along the “Equator” with your protractor or estimate.
Coordinates
Explain Cardinal Points: N, S, E, W.
Explain coordinates:
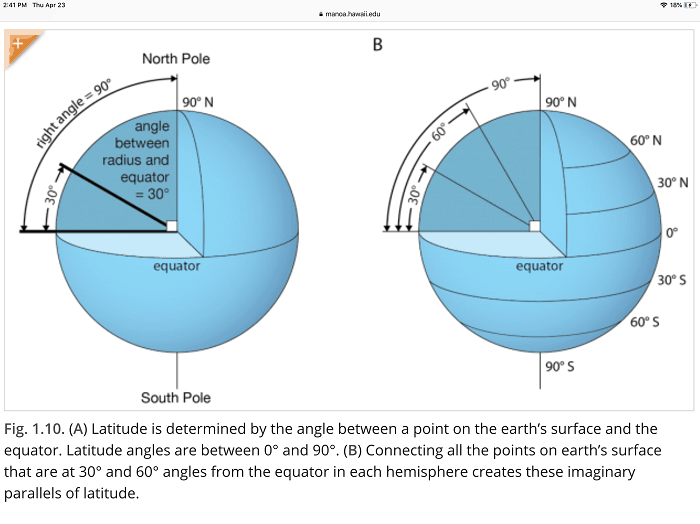
Recap longitude lines and parallel lines. The parallel lines measure LATITUDE. These measure the degrees going North and going South.
The longitude lines go from 0 degrees to 180 degrees E. And from 0 degrees to 180 degrees W.
So we can see the latitude goes from 0 (the Equator) to 90 degrees. Either north all the way up to the North Pole, or South all the day down to the South Pole.
The points on the map or the globe where these lines meet, make a cross. (Point to a place on the map where they cross) are called COORDINATES.
Practice finding places on the map by giving easy coordinates they can find by following the lines on the world map.
Next day, Recap the above activity. Take turns. The child can give the coordinates and you have to guess what is the country, and vice versa.
Explain that the entire globe would be covered in these degree lines going north and south and east and west, but our map and globe only show them every ten or twenty degrees.
Practice finding degrees that would be between the lines they can see on the map, and estimate where they would be.
Explain that in addition to all the degree lines, in order to get more specific and find, for example, treasure, you need more lines between the degree lines. These are minutes and seconds. (I don’t go into a lot of detail here because this is when you loose them.)
Prepare a Treasure Hunt
Much like Geo-catching. Bury “treasure” in the back yard, at the park, at another site.
This is time taking. You will need to book some time for this activity. Both for the person setting the Treasure Hunt, and for the kids to find the treasure.
If you cannot do it while you teach the coordinate lesson, you can save it for a time when you can do it and it is a wonderful way to recap coordinates.
I put if off until a time when the kids had a lot of time on their hands. This happened during the COVID-19 crisis and our town was under lock-down but we could go ride our bikes and go for walks). Great activity for when there is nothing open, good weather and can be shared with other kids.
What you need:
- A smart phone with Google maps or another maps app.
- Enough treasure for at least 4 locations. Coins, treasure, trinkets, etc. I like to use some metal pieces so the kids can use a metal detector for some of the hunt. But not required.
- A notebook and pen to write down the coordinates.
- A link on your phone to this website. Which converts the decimal degrees that might come up on your maps, to DMS (degrees, minutes, seconds) which is what the kids area learning to read.
Find a good spot to hide or bury treasure. Stand over it or near it and, open your map app, let your map app figure out where you are -you will see a dot around where you are standing. Put your fnger for a second on the dot. You will see a location bubble on your map. Clck on that bubble or simply look and see at the address field above. You should see tow long sets of numbers. If your phone is having trouble triangulating, and you know where you are, press down on the map where you are and copy those coordinates.
If the coordinates look like long numbers that you can not read in degrees, minutes and seconds open your DMS converter and paste in the coordinates from your phone.
Don’t forget to make a clue for each location. As the treasure will be within 6 or 10 feet of each coordinates. Take a picture of the site or make a drawing, tack up rocks. Etc. Have fun with the clues.
The Treasure Hunt
Explain this is how real archeologists, and treasure hunters use. Also, if someone needs to be rescued, they can be found if they give you their coordinates.
This is a hard activity. And it will be enjoyed if there is nothing else on the calendar and it’s not too hot outside.
Write everything down on your notebook. Give the kids the coordinates along with the clues. Maybe also photos of the sites if there are some confusing sites. Give them the phone so that they can plug in the coordinates on the map and navigate to the spot. Or print them out beforehand at the house.
Lesson 10. The Weather
Read
Weather Patterns:
Explain weather fronts, high pressure and low pressure fronts. Wind patterns in the different parts of the earth.
Use the Globe to identify the areas.
Activity:
Buy a paper map of the world and mark where the main currents are (along the pacific coast of the American continent -cold current that makes that part of the pacific very cold)
Types of weather
How are storms formed.
Types of storms
What is lightning and thunder
Refer back to the book
Weather Forecast:
Why is the weather cold in winter in the Northern Hemisphere?
What is it like in the Southern Hemisphere in December?
Explains what happens as low pressure meets high pressure fronts. Wind patters
Explain the oceans warm up slower than the land. In the summer the land gets very hot but the water along the pacific is very cold. That dry heat from the land pulls the cold out from the pacific and that creates clouds and moisture often leading to rains. The same happens in the Golf of Mexico and in the Atlantic. Often leading to big summer storms.
Explain Monsoons
In the winter the ocean water is warmer because it had time to warm up through the summer and it takes a long time to cool down again. But the wind and air above is cold, so vapor is created and clouds are formed so it rains.
Activity: Create the Perfect Storm
When does it rain in the Southwest?
Lesson 9. Reading maps (have a 2D world map in addition to the globe)
Mountains, Elevation, Altitude, Topographical maps
Elaborate on this…
Activity: Learning to read topographical maps – fun with 3D lenses to perceive the elevation on the maps.